LASH LIFT & BROW /TINT
eyebrow & eyelash tint/lift
With defined, well-groomed brows and brow tint gives you a thicker look and a more youthful appearance without having to apply makeup daily. A brow tint will last up to four weeks. Our licensed and experienced professionals will help you choose which style is best suited for your eye shape, desired look and lifestyle.
LASH LIFT & TINT
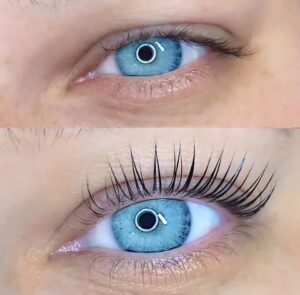
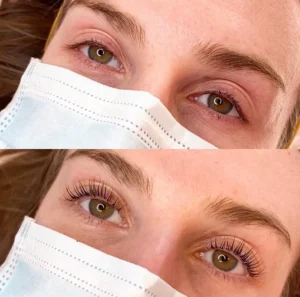
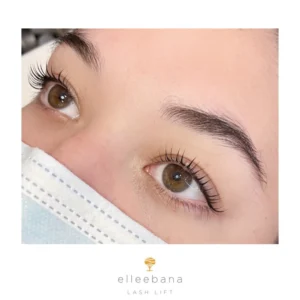
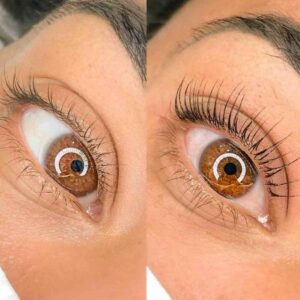
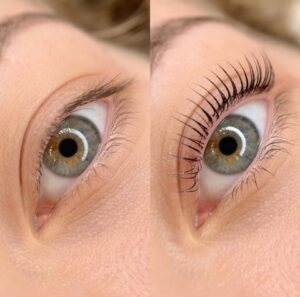
Our lash lift and tint is the perfect alternative for those who don't want eyelash extensions, but still want to ditch the mascara. Lash lifting uses silicone rolls to give a lifting effect from the base of the eyelash, creating a subtle and natural lift. The lash lift will make your natural eyelashes appear longer with minimal maintenance required. Lash lifts will last up to 8 weeks. We recommend pairing this service with eyelash tinting which last 4-6 weeks.
Lash Lift Aftercare: No heat, steam, saunas, water, oil, lotions, or makeup remover for 24 hours following service. During the first 24 hours, your lashes are still shape shifting so be gentle.
BROW SERVICES
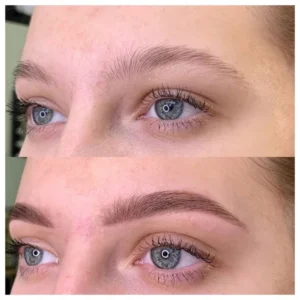
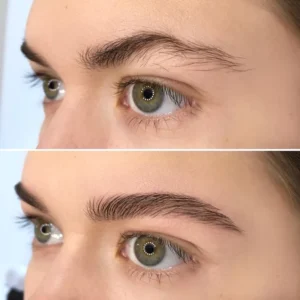
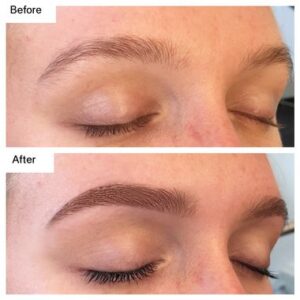
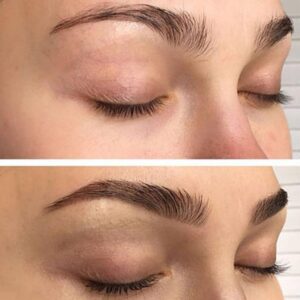
With well-defined, well-groomed brows and brow tint, you can achieve a thicker look and a more youthful appearance without having to apply daily makeup. A brow tint will last up to three weeks.
BROW LAMINATION
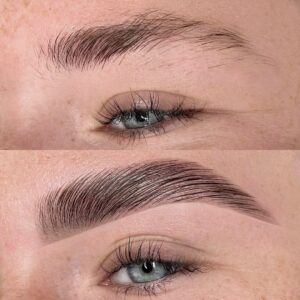
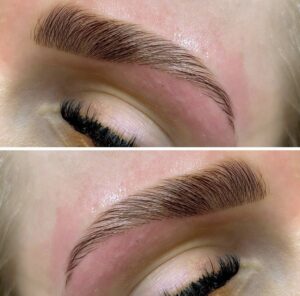
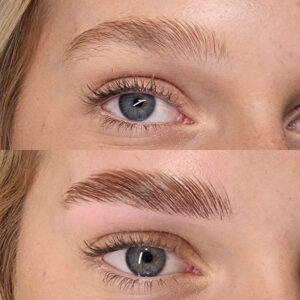
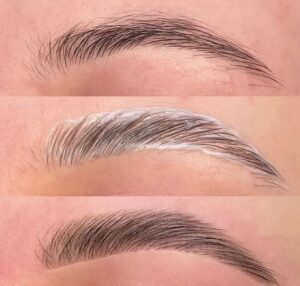
Brow lamination is an eyebrow perming treatment that involves correcting the brow shape by setting the hairs in place using a chemical solution. Brow lamination is a two-step process. Firstly, a cream is applied that breaks down bonds in the eyebrow hairs so they can be manipulated into a new position. The treatment should last until your brow hairs grow out (up to six weeks). We recommend that you receive treatment when needed or every four weeks. Brow lamination aftercare is simple - avoid steam baths and saunas for 24 hours.
How to Do a Brow Lamination: A Step-by-Step Guide
Perfect brows are everywhere, from social media mavens to print models to movie stars. You and your professional brow lamination kit can be your client's secret weapon when achieving the brows they've obsessed over.
Adding brow lamination to your repertoire is a no-brainer. This straightforward treatment offers a revolutionary solution for those who want fuller, well-defined, and perfectly shaped eyebrows. A semi-permanent treatment, it can transform even the most unruly brows into sleek, stylish arches that last for weeks.
Are you intimidated to take it on? Don't be. In this guide, we'll walk you through the entire process from start to finish. Whether you're an aspiring brow artist or looking to up your eyebrow game, get ready to discover all the secrets behind laminating your first brows.
Introduction to Brow Lamination
The process involves straightening and setting the brow hairs in the desired direction, allowing for more control and versatility in shaping and styling. People often compare the results of a brow lamination to a brow lift since the treatment holds the hairs in a lifted position, giving the appearance of a more youthful and polished look.
One of the critical benefits of brow lamination is its longevity. Regarding brow lamination versus microbladingor other traditional brow treatments, which may require frequent touch-ups, brow lamination can last up to 8 weeks. This makes it a convenient and low-maintenance option for those who want to wake up to perfectly styled brows every day.
Pre-Treatment Considerations & Consultation
Before starting, setting aside just a few minutes for a consultation with your client is essential. Here are some of the things you'll want to go over with them:
- Contraindications: Ensure the client has not had recent brow tattoos, used henna, or recently undergone bleaching treatments. These factors can lead to adverse reactions during the lamination process.
- Skin sensitivities: Ask your client if they have any known allergies to the ingredients in your brow lamination products, such as lotions, primers, or tints. This will help you avoid any adverse reactions during the treatment.
- Expectations: Ask your client about their preferred brow shape, thickness, and style. Show them reference images or examples to ensure you understand the final result they hope to achieve.
- Natural eyebrow characteristics: Analyze your client's natural eyebrows. Consider factors such as their brow density, hair growth direction, symmetry, and specific areas of concern.
- Performance of a patch test: Apply a small amount of the lamination products to the inside of the client's wrist and leave it for the recommended time. Monitor the client's skin for adverse reactions, such as redness, itching, or irritation. If any signs of a reaction occur, choose alternative products or consider alternative treatments.
- Client education: Explain the brow lamination process, the expected results, and the aftercare routine. Discuss any potential side effects or risks involved. This will help your client feel more comfortable and informed about the treatment.
Step-by-Step Brow Lamination Process
Now, let's dive into the step-by-step process of brow lamination to ensure you clearly understand the procedure.
- Clean the Eyebrows
Start by thoroughly cleansing your client's eyebrows to remove any traces of makeup, oils, or dirt. This step is essential to ensure the lamination products adhere correctly. Use a gentle cleanser or micellar water to cleanse their brow area, removing any residue.
- Lock in the Shape
Groom the brow hairs into the desired shape and use adhesive to isolate the brows. This will help you work with precision throughout the rest of the treatment.
- Apply the Lifting/Curling Lotion
Apply the lifting or curling lotion to your client's eyebrows using a small brush or applicator. This lotion softens the keratin in the brow hairs, making them malleable for reshaping. The direction of the hairs during this step doesn't impact the final result. Still, it's essential to apply the lotion generously to ensure effectiveness. The lifting lotion breaks down the hair structure, making it more pliable and accessible to manipulate during the shaping process. Be very careful to leave the lifting lotion on for only the recommended time, typically 4-7 minutes, depending on the density of the brow hair; otherwise, you risk over-processing the brows and having to fix it.
- Apply the Setting Solution
After you've left the lifting lotion on for the recommended time, gently wipe your client's brows with a cotton pad to remove it. Once you've completely removed the lifting lotion, apply the setting solution to their brows using a clean brush or applicator. This solution sets the hairs in their new shape. Ensure that the brow hairs are not elevated excessively, which could cause kinks when they grow out. Leave the setting solution on for the recommended time, usually around 4-7 minutes.
- Apply the Neutralizing Solution
After setting the brows, apply a neutralizing lotion to restore the pH balance and repair the hair bonds that were broken during the lifting process. This step is crucial to ensure the brows hold their new shape and remain healthy. Allow the neutralizing lotion to process for the recommended time.
- Perform Tinting (Optional)
If your client desires a more defined look or wants to darken their brow hair, this is the time to apply a tint or henna coloring. Choose a tint shade that complements their natural hair color and skin tone. Apply the tint carefully to their brows, covering all the hairs evenly.
Leave the tint on for the recommended time, usually around 3-5 minutes, depending on the color the client wants to achieve, before removing it with a cotton pad. Remember, due to their chemically treated state, brow hairs will take a tint much more quickly after lamination. Therefore, the processing time should be reduced to avoid over-darkening.
- Apply Moisturizing Serum
After removing the tint, applying a moisturizing product to your client's brows is essential. This step helps nourish and condition their hair, giving it a healthy and glossy appearance. A serum that contains keratin or other nourishing ingredients is recommended to maintain brow health post-lamination. Apply it to their brows using a spoolie brush or your fingertips.
- Perform Waxing/Threading/Plucking
The final step is to further shape your client's brows by waxing, threading, or plucking stray hairs outside their desired brow shape. This step helps to achieve clean and well-defined brows, enhancing the overall effect of the brow lamination. Use your preferred method of hair removal to tidy up their brow area.
Brow Lamination FAQs
Do you need qualifications to do brow lamination?
Most states require a professional license to perform a brow lamination on a client. Attempting to do brow lamination at home without professional training poses risks, such as over-processing and uneven results. If you receive additional training beyond what's necessary to acquire your license, it could help set you apart from others in the beauty industry. You should be familiar with the specialized products the process requires and also be able to ensure your client's safety and achieve good results.
How long does brow lamination last?
Brow lamination can last up to 8 weeks, depending on your client's hair growth cycle, aftercare routine, and lifestyle. It is essential to educate your clients about the proper maintenance and aftercare to help prolong the lifespan of their treatment. They may need regular touch-ups to maintain their desired look.
Is brow lamination suitable for everyone?
Brow lamination is generally suitable for most people. However, it's not a good option for people with susceptible skin, skin conditions, or recent skin treatments around the eyebrow area. Clients with recent brow tattoos, henna, or bleaching treatments should avoid brow lamination due to potential adverse reactions. Pregnant or breastfeeding individuals should consult with their healthcare provider before undergoing brow lamination.
Keep in mind specific clients may experience better results than others. For example, suppose you're performing a brow lamination on a person with thick brows. In that case, they may see a better outcome than a person with very thin or sparse eyebrows since there's more hair to work with.
Can you still use brow makeup after the lamination?
Yes, you can still use brow makeup after the lamination process. In fact, brow makeup can help enhance the final result and fill in any sparse areas if desired. However, your clients should wait at least 24 hours post-treatment before applying makeup to allow the product time to fully set.
What are some brow lamination aftercare tips?
Proper aftercare is critical to maintain the results of brow lamination. Clients should avoid getting their brows wet, using harsh skincare products, or applying makeup for at least 24 hours post-treatment. They should also avoid using oil-based products on their brows, as these can break down the lamination faster.
←
